I want to tell you about my friend’s Christmas nail designs. If you want to make it more of a winter feel rather than a Christmas one, you could realistically use any hue and add snowflakes or the like. Get ready to make your manicure a festive highlight of your holiday look. It all boils down to having fun with the season’s staples, which include metallics and jewel tones when it comes to Christmas nail art. “Festival hues like red, green, and gold can be incorporated into simple styles like a French manicure, explains nail artist San Sung Kim.
1. Classic Christmas Colors for Nails
Let’s first discuss the ideal manicure colors for Christmas nails before moving on to other nail designs. Best Colors for Christmas Nails
- Red: A classic holiday color that represents warmth and festivity.
- Green: Perfect for a Christmas tree or wreath design.
- Gold: Adds a touch of elegance and sparkle.
- Silver: Great for a wintery, snowy effect.
- White: Ideal for snowflakes and snowy designs.
- Blue: Can be used for a frosty, icy winter look.
Now that we have our colors, let’s explore different Christmas nail designs!

Simple Christmas Nail Designs
If you prefer easy and elegant nail designs, here are some simple ideas:
Solid Color with Glitter
Paint your nails in red, green, or gold, and add a glittery top coat for a festive touch. This is an effortless but beautiful Christmas nail design. A solid color and glitter is a combination of a solid color and glitter, which is a reflecting, dazzling substance. Usually composed of plastic, glitter is coated with aluminum or other elements to give it a glossy appearance.
Candy Cane Stripes
Use a white base and draw diagonal red stripes to create a candy cane effect. You can use tape to make the lines straight The candy’s crook represented shepherds, and its crimson and white stripes
represented Christ’s innocence. Even if the mythology is unsupported by hard data, it gives the story of the candy cane a magical touch.
Christmas Dots
Apply a neutral or red base color and use a dotting tool or the tip of a bobby pin to add red, green, and white dots. This is an easy but stylish design order to commemorate the festive season. Christmas dot nails are adorned with red, green, and gold dots. The dots can be applied with a dotting tool.
Minimalist Christmas Tree
Paint a small green triangle on one nail to create a Christmas tree. Add a small dot on top to represent a star. Christmas trees on a light or nude background are the focal point of minimalist Christmas tree nails, which are a joyful and straightforward manicure design. Clear lines, sparkle, and subdued hues are frequently used in the nail design.
Snowflake Nails
A white snowflake on a red or blue background looks classy and elegant. Use a thin brush or a stamping tool to create the snowflakes. Refers to a nail art design that uses snowflake patterns, usually in silver or white, on the nails. It is frequently used as a winter-themed manicure to simulate the appearance of falling snow; depending on personal preference, it can be as simple as delicate snowflakes or as complex as glitter or different colors.
Cute and Fun Christmas Nail Designs
For those who love playful and detailed designs, here are some fun ideas:
Santa Claus Nails
Create Santa’s hat on your nails by painting the tips red and adding white fluffy dots at the bottom. You can also draw a full Santa face for extra cuteness.
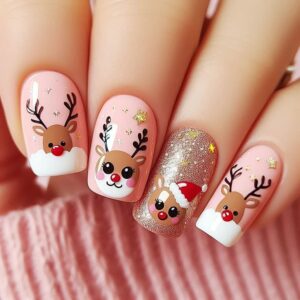
Reindeer Nails
Paint your nails light brown and draw a small reindeer face on one nail using black and red polish. Add small antlers for detail.
Christmas Sweater Nails
Create a cozy sweater pattern using red and white polish. You can draw zigzags, dots, and lines to mimic a knitted sweater.
Gift Box Nails
Paint your nails in a single color and draw a tiny bow or ribbon to make them look like presents.
Christmas Lights
Use a white or neutral background and draw tiny Christmas lights in different colors.
4. Elegant and Glamorous Christmas Nail Designs
Try these lovely Christmas nail designs if you want your nails to look professional and elegant:
Gold and Red Ombre
Blend red and gold nail polish to create a beautiful ombre effect. This looks glamorous and festive.
French Tips with a Holiday Twist
Instead of white tips, use red or green with a gold glitter line for an elegant holiday look.
Holly Leaves and Berries
Paint small green holly leaves and red berries on a nude or white background.
Metallic Nails
Use metallic red, green, or gold polish for a luxurious, shiny finish.
Icy Blue and Silver
A blue and silver color combination creates a frosty, winter wonderland effect.
5. Christmas Nail Designs for Short Nails
Do not be concerned if your nails are short.! You can still create beautiful Christmas nail designs.
- Solid red with one accent nail: Keep all nails red and add a glittery gold or white accent nail.
- Tiny Christmas trees: A small Christmas tree on one nail looks adorable and stylish.
- Polka dots: Simple and easy, polka dots in red, green, and white create a festive look.
- Minimalist snowflakes: A tiny snowflake on one or two nails looks elegant and subtle.
6. Christmas Nail Designs for Long Nails
Long nails give you more space to create detailed designs. Here are some creative ideas:
- Full Santa face: Paint a detailed Santa Claus face on one or more nails.
- Detailed snowflakes: Long nails allow for intricate snowflake designs.
- Christmas scene nails: Create a tiny winter village or a Christmas night sky.
- 3D nail art: Add tiny rhinestones, stars, or pearls for a dramatic effect.
7. How to Do Christmas Nails at Home
To have festive nails, you don’t have to visit a salon. You may create Christmas nail designs at home in the following ways.
Tools You’ll Need:
- Base coat
- Christmas-colored nail polishes
- Nail art brushes or toothpicks
- Dotting tool or bobby pin
- Topcoat for a long-lasting finish
- Nail stickers (optional)
Step-by-Step Guide
Prepare Your Nails: Trim, file, and clean your nails before starting.
Put Base: Coat on your nails to protect them and extend the wear of the paint.
Select Your Design: Choose from a straightforward or intricate Christmas nail design.
Make Use of Nail Art Tools: Use brushes, dotting tools, or stickers to create perfect patterns.
Apply Top Coat: You should add a top coat to your design for more durability and gloss.
Conclusion
One of the most enjoyable ways to celebrate the holidays is to apply nail paint. Whatever their taste in simple, cute, or stylish designs, everyone may discover the perfect manicure. To make your nails seem lovely and festive, use your imagination and experiment with various designs. Regardless of your skill level, you can create stunning Christmas manicures with a little work. Learn more about nail art with Rane’s beauty courses, which provide professional advice and practical instruction to help you launch a lucrative career in India and beyond.
For more information, click here